Showing posts with label CharcutePalooza. Show all posts

Monday, January 23, 2012

Banh Chung

Recently, I learned eating banh chung is a traditionally eaten during the Lunar New Year.  Previously, banh chung was simply something my Vietnamese grandma would always make around the holiday season and sometimes during other parts of the year.  No matter the occasion or time of year, though, I could never get enough of her banh chung.

IMG_0226

Her version is a vegetarian one: glutinous rice and mung bean wrapped in banana leaves.  Personally I don’t mind the lack of meat because for me it’s all about the rice.  When you boil glutinous rice for several hours as you do for banh chung, it takes on a unique texture when you eat it at room temperature and the aroma of the leaves comes through.  The texture is almost between that of onigiri and mochi.  Slightly chewy but yielding.

IMG_0219IMG_0223

The texture can take on a drastically different profile when the banh chung is flattened and fried in a pan until golden brown.  In this form, the texture is crispy on the outside and chewy on the inside.  After going back and forth between which preparation I prefer most year after year, I recently came to the conclusion that I prefer the non-fried version.  I find that frying the banh chung kills the subtle flavors of the rice and leaves.

IMG_0236

So for my banh chung, I eat it at room temperature.  This time around, I filled mine with leftover pork rillettes from CharcutePalooza that I had in the freezer, and instead of wrapping the banh chung in banana leaves I used lotus leaves simply because that’s what I had in my pantry.

Banh Chung (makes about 3 individual servings)

Mise En Place

  1. 200 g glutinous rice, soaked overnight in water and a few drops of pandan extract
  2. 200 g mung beans, soaked overnight in water
  3. 200 g pork rillettes or some other protein
  4. 3 lotus leaves or banana leaves, soaked in warm water
  5. Fish sauce

Method (for 1 individual serving)

  1. Drain mung beans and place in a pot with enough water to cover.  Simmer until tender and mash, about 25 minutes.  Season with fish sauce and pepper.
  2. Drain rice and season with fish sauce.
  3. Fold the leaf in half so it is doubled.
  4. Place 1/6th of the rice in the middle of a leaf in the shape of a rectangle.
  5. Place 1/3rd of the protein on top of the rice.
  6. Place 1/3rd of the mung beans on top of the rice.
  7. Place 1/6th of the rice on top of the mung beans.
  8. Shape into a rectangle by hand and wrap tightly with twine.
  9. Wrap again in foil
  10. Place in simmering water, weighted down, for about 6 hours.

Tuesday, December 6, 2011

CharcutePalooza Final: Tapas

CharcutePalooza has been quite the experience.  Twelve months of brining, curing, grinding, stuffing, and smoking have come and gone.  With each challenge came a new technique or a refinement of a previous one.  These techniques opened up the door to new dishes and new flavors, though admittedly most of the composed dishes were rooted in something from my past.
IMG_0406

Beyond the obvious things like sausage making, CharcutePalooza has drilled into me something I can utilize in and out of the kitchen: organization.  Organization doesn’t just apply to mise en place but starts the moment conceptualization begins on a new dish.  Corralling disparate ideas, flavors, and experiences and focusing them into a cohesive composed dish around a single charcuterie item each month was an exciting test of my organizational skills.  So to say I was ecstatic that the final challenge required the use of four distinct charcuterie items was an understatement.
Scan.BMP

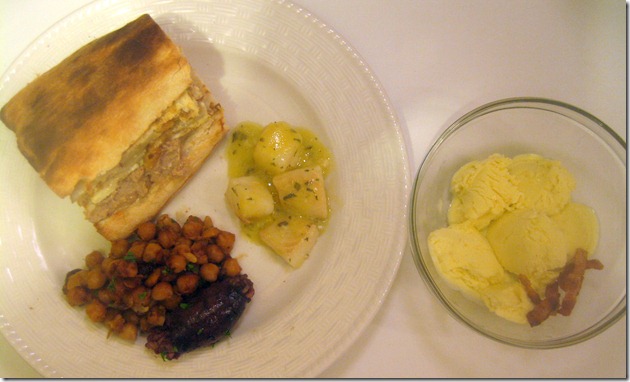
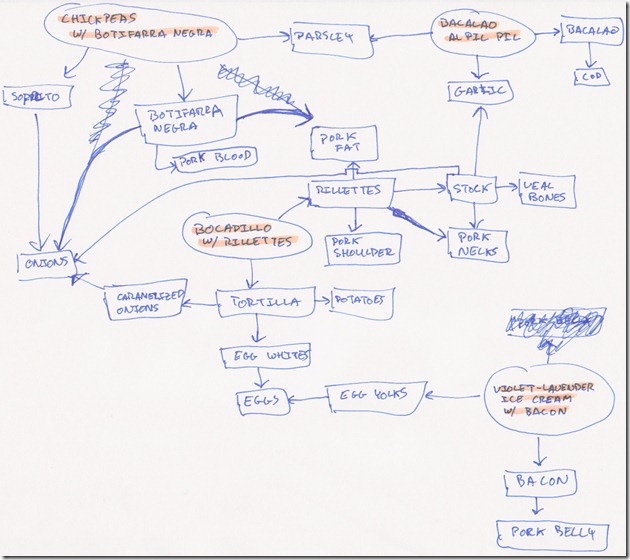
The moment the final challenge was announced I knew wanted to do four separate Spanish-inspired tapas-sized dishes to be served as an entire meal.  After much deliberation I chose to make bacalao al pil pil, a rillettes and tortilla bocadillo, chickpeas with botifarra negra, and violet-lavender ice cream with bacon.  This selection was a result the experiences I had in Spain and the confluence and osmosis between shared ingredients as seen in the above scribbling.
IMG_0255

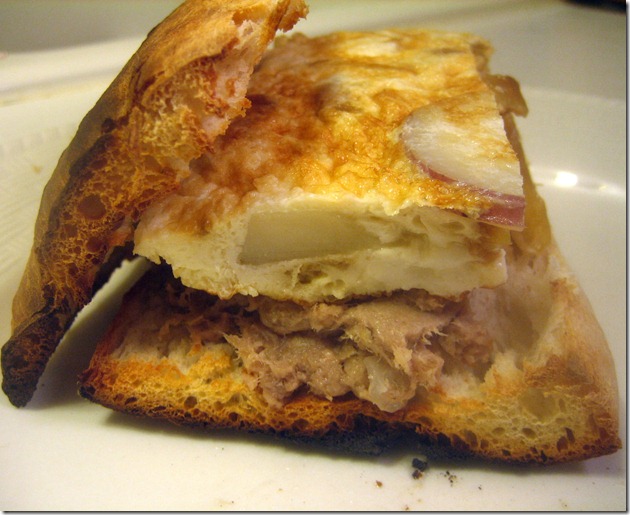
The first tapa was a rillettes and tortilla bocadillo.  Tortillas (Spanish omelettes) and bocadillos (baguette-like sandwiches) are popular in Spain.  When combined, they make one of Spain's most beloved sandwiches.  One regret I have was not seeking out a quality bocadillo as the ones I had were pretty dry and bland.  To make sure I wouldn’t have that problem, I decided to lubricate my bocadillo with a nice spread of rillettes.

IMG_0214

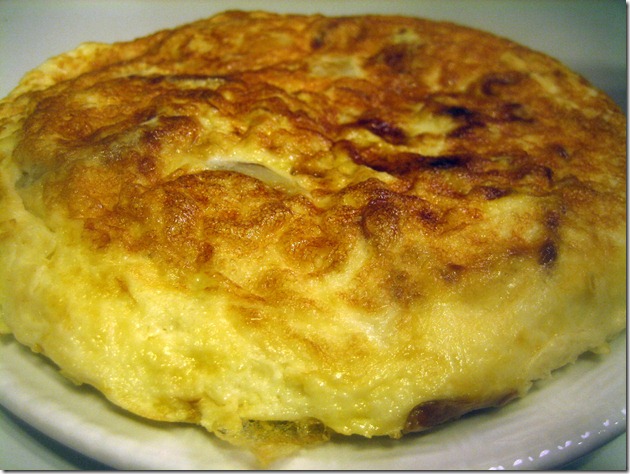
The fat and meat from the rillettes also added richness to the bocadillo which would normally be provided by the egg yolks in the tortilla.  However, this was an egg white tortilla.  Early in the planning stages I realized I would have a lot of unused egg whites as a result of making the ice cream.  At that point, I decided to make my tortilla an egg white tortilla from the orphaned egg whites.

IMG_0358

Having imagined my rillettes potentially turning about to be no more than glorified pulled pork, I was a bit skeptical at first.  However, the rillettes came out surprisingly spreadable and not stringy at all.  Cooking the pork in a veal-pork stock contributed a lot to the flavor.  From that stock, I was able to use the cooked meat from the veal bones and pork necks in the rillettes itself.
IMG_0376

Due to a lack of Spanish bakeries in my vicinity and also due to my unconditional love for shoti, I chose to use a toasted piece of shoti for the bread.  It’s crispy exterior and chewy interior made it a great great vessel for the rillettes and tortilla.
IMG_0142

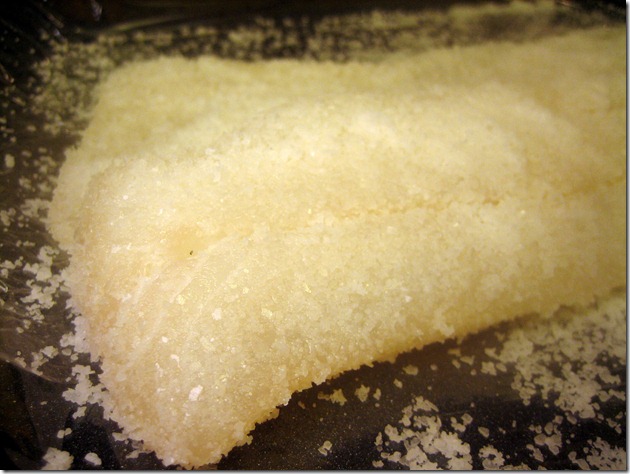
The second tapa was bacalao al pil pil: salt cod pil pil style.  Bacalao is king in Spain, and one of the most traditional preparations is the Basque pil pil style.

IMG_0196

Salting the cod to make the bacalao was step one.  My fridge was quickly taken over by the smell of dried fish despite putting two boxes of baking soda next to it.
IMG_0302IMG_0310

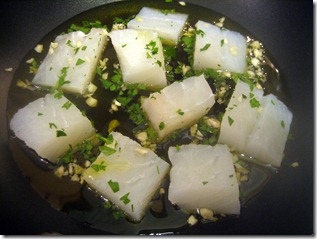
After rehydrating the bacalao, it’s placed in a pan with olive oil, garlic, and parsley.  As the bacalao cooks, it releases water and proteins into the oil.  Once the fish has been cooked, the pan is swirled to create an emulsion between the oil, water, and proteins.  This is what makes the dish “al pil pil.”

IMG_0261IMG_0270

The third tapa was chickpeas with botifarra negra (blood sausage).  Legumes are very common in Catalan cuisine, and the legendary Bar Pinotxo in Barcelona’s La Boqueria serves up their signature chickpeas with botifarra negra for breakfast and lunch.  Thankfully, finding fresh pork blood wasn’t very hard as my local Vietnamese market always seems to have it in stock.
IMG_0277

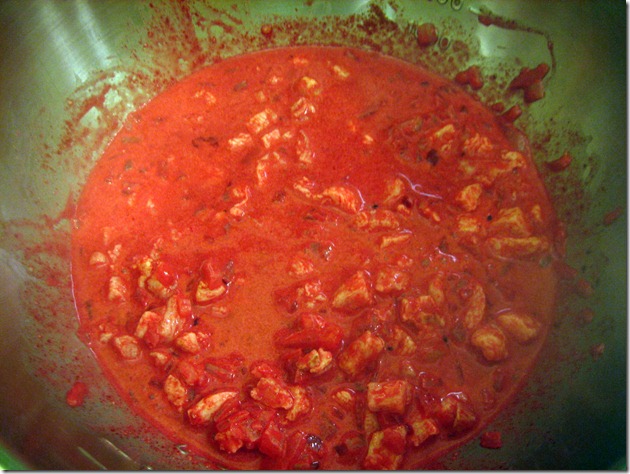
Ruhlman was right about blood sausage being one of the easiest sausages to make.  Once the blood was liquefied,  all that was required was to mix in some pork fat, onions, and seasoning and shove the mixture into the casing through a funnel.  Not being able to find any recipes for botifarra negra, I simply took the blood sausage recipe from Charcuterie but seasoned it with salt and pimenton de La Vera (Spanish smoked paprika).

IMG_0291IMG_0327IMG_0347

From what I recall, Pinotxo’s version of the dish had the botifarra crumbled and distributed throughout the chickpeas.  I preferred to keep it in casing so I could control the amount of botifarra eaten with each bite and also reap the rewards of the Maillard reaction.  A balsamic vinegar reduction and raisins added the perfect amount of acidity and sweetness to cut through the botifarra’s fat.

IMG_0208

The last tapa was a serving of violet-lavender ice cream with bacon.  After having a violet ice cream at DiverXO, I learned that violet confections are very traditional in Madrid.  In fact, there’s a shop called La Violeta that specializes in such candies.  Having grown up on Vietnamese desserts, which tend to have some element of salt, my palette is tuned to crave a little bit of salt with my sweets to balance thing out.  In this case, the bacon not only added salt to the ice cream but texture.

IMG_0235

The reason for not making a pure violet ice cream was because I found it fairly difficult to source violet extract.  I was able to get a hold of some violet syrup, but it ended up tasting like cough syrup.  If I were to make this ice cream again, I’d probably wait until violets were in season and use fresh petals.

IMG_0411

Of all the dishes, the ice cream unfortunately reminded me the least of Spain.  There wasn’t much violet flavor because I held back on the syrup, and putting too much lavender extract made the ice cream taste citrusy with floral and minty notes; the flavor was much like Fruit Loops.  That’s not to say I didn’t enjoy the ice cream.  In fact, it tasted like one of my favorite ice creams: blue moon.  Because I opted not to add food coloring, I dubbed the accidental ice cream “yellow moon.”

IMG_0386

And so CharcutePalooza has come to an end.  It was a fun and wild ride, and I’m very glad I participated.  I learned a lot, I cooked a lot, and I ate a lot.


Egg White Tortilla De Patatas Y Cebolla

Mise En Place

  1. 300 g potatoes, sliced 2-3 mm thick
  2. 480 g egg whites (about 12 egg whites)
  3. 150 g caramelized onions
  4. An 8” nonstick pan

Method

  1. Whisk egg whisk until combined and add caramelized onions
  2. Shallow fry the potatoes over medium heat until tender, about 5-10 minutes
  3. Add hot potatoes to egg mixture and season with salt
  4. Drain the pan of the oil but leave some for the egg mixture
  5. Pour egg mixture into the pan and reduce heat to medium-low
  6. After about a minute, gently work the pan by swirling it and tucking the edges in
  7. Once the bottom is set (about 5 minutes), place a cover of plate over the top of the pan and flip the egg mixture onto the plate so the runny side is on the top side of the plate
  8. Slide the egg mixture onto the pan, runny side down, and cook for another 2-3 minutes


Bacalao Al Pil Pil (adapter from here)

Mise En Place

  1. 225 g bacalao (dried mass), rehydrated and cut into 1” cubes
  2. 1 clove of garlic, minced
  3. 5 g parsley, minced
  4. Extra virgin olive oil

Method

  1. Place bacalao in a pan such that they do not touch each other
  2. Fill the pan with enough oil such that it covers half of the bacalao
  3. Heat the pan over medium heat until the oil starts to simmer
  4. Lower the heat to medium-low and cook for 5 minutes
  5. Flip the bacalao and cook for another 5 minutes
  6. Pour off about half the oil
  7. Swirl the the pan to start the emulsion and swirl until thickened


Chickpeas With Botifarra Negra

Mise En Place

  1. 225 g dried chickpeas
  2. 30 g sofrito
  3. 1.5-2 feet of botifarra negra
  4. 15 g raisins
  5. Parsley, minced
  6. Balsamic vinegar reduction

Method

  1. Cook chickpeas in a pressure cooker at full pressure for 35 minutes.  Release pressure naturally and drain
  2. Brown botifarra under the broiler on in a pan and portion as you wish
  3. Heat the sofrito through in a pan over medium-high heat and add the chickpeas and raisins
  4. Top the chickpeas with the botifarra, parsley, and balsamic vinegar reduction

Yellow Moon Ice Cream Base (adapted from Ratio)

Mise En Place

  1. 650 g heavy cream
  2. 240 g milk
  3. 170 g sugar
  4. 225 g egg yolks (about 12 extra large egg yolks)
  5. 75 g violet syrup
  6. 5 g lavender extract

Method

  1. Whisk sugar and yolks together
  2. Bring cream and milk to a simmer over medium heat
  3. Slowly pour the cream and milk into the sugar and yolks while whisking continuously
  4. Pour the mixture back into the pan and stir continuously until nappe
  5. Pour the mixture into a bowl set over ice water and stir until chilled
  6. Stir in violet syrup and lavender extract

Thursday, December 1, 2011

Bresaola Pintxo

This being the second to last CharcutePalooza  challenge, I couldn’t help but start counting the days until the winner is announced.  That slightly unsettling feeling of anticipation also permeated the November curing challenge.  Time was the name of the game this challenge, but good things come to those who wait.
 
Evernote 20111130 013052
Although a lot of my recent cooking has been influenced by my trip to Spain a few months ago, I decided against making chorizo for this challenge.  I wanted to make something I'd never had before, and after flipping through the options in Charcuterie, I found bresaola to be the only option that would satisfy both the CharcutePalooza parameters and my own personal quest to try new things.  However, that's not to say the final usage of the bresaola didn’t reflect some of the things I experienced overseas.
 
Evernote 20111130 012544
 
Having done all 12 challenges at the time of this writing, I can definitively say this was the easiest challenge in terms of the difficulty of producing the meat product and difficulty of producing the final composed dish.  When you boil it down, the manual labor involved in curing something is minimal: salt the meat, wait, rinse the meat, hang the meat, wait.  Easy on the muscles, but tough on the brain.
 
 Evernote 20111130 012656
 
During the period the meat was hung out to dry, several things ran through my mind:
  • This thing is going to taste so awesome.  I can't wait!
  • Oh cool, some small specs of white mold have started to develop.  Hopefully that keeps the bad mold away.
  • Wait a second, does that small white spot look sort of fuzzy?  I don't think so...I think it's ok...
  • Crap, what if that spot really was fuzzy?
  • What the heck, how is half of the surface area suddenly covered in fuzzy green mold??
  • Wiping the fuzzy green mold with a brine solution seems to have gotten things under control.
  • Will I get botulism?
  • Great...fuzzy green mold is back again.  Time to try a vinegar wipe down suggested by a fellow CharcutePaloozer.
  • Phew!  Two weeks of no fuzzy mold!  Vinegar > brine solution.
  • What??  Fuzzy white mold one day before I plan on cutting into this baby...
  • Oops...the meat has lost 45% of its mass.  I hope that doesn't have any adverse effects.
  • Hopefully the vinegar in the pickled pepper and salt in the olive kill any pathogens.
  • Here goes nothing...
  • I'm not dead or incapacitated!
  • Curing is magical.
Evernote 20111130 012804Evernote 20111130 012856Evernote 20111130 012929
 
Like I said: easy on the muscles, but tough on the brain.  The final composed dish, or more appropriately pintxo, was inspired by the pintxos found in the Basque country.  I also figured I should make something simple so the bresaola could shine.  I didn’t want all that waiting and worrying to be in vain.  One of the most popular pintxos in the Basque country consists of fresh anchovy, olive, and I believe pickled piparras peppers.  At one particular stall at the Mercado de San Miguel in Madrid, this pintxo served as the basis for a wide array of pintxos that all followed a similar template: a protein, a pickled something, and an olive.
 
IMG_0469

From this template, I made a pintxo of bresaola, pickled banana pepper, and an olive.  Salty, briny, and sour in one bite.  I did plan to use olives that I’d recently started curing from fresh, but sadly they were still extremely bitter.  I was genuinely surprised how much herb flavor came through in just a thin slice of meat, and that herbal flavor was nice in the bite.  Overall, I was happy with how the bresaola and the pintxo turned out and found myself eating the bresaola plain after running out of olives.


Bresaola Pintxo

Mise En Place

  1. Thinly sliced bresaola
  2. Pickled pepper
  3. Pitted olive

Method

  1. Skewer one olive, one slice of bresaola, and one pickled pepper onto a toothpick

Saturday, October 15, 2011

Chinese Soy Sauce Chicken Galantine

One of the things I really enjoy about CharcutePalooza is learning to make new things while at the same time trying to figure out how to incorporate something familiar into each challenge.  That point of reference could be a flavor, a texture, an aroma, an ingredient, or a technique.  For the October CharcutePalooza, galantine, I drew from Chinese BBQ: soy sauce chicken and cold poached chicken with ginger-scallion oil.

IMG_0044

Keeping with the Chinese influence, I decided to use the Chinese holy trinity of ginger, scallion, and garlic for the aromatics and shiitake mushrooms and wood ear fungus for the garnish.

IMG_9923IMG_9927

When it came time to make the galantine, some parts were easier than others.  Thanks the previous challenges, producing the forcemeat was a breeze.  I was worried about skinning the chicken, though, as the recipe calls for keeping the skin in one piece.  However, it was surprisingly easier than I thought.  The only part I struggled with was separating the end of the drumsticks from the skin by pulling the drumsticks through “as if you were removing a tight shirt.”

IMG_9943IMG_9913

Up until the point where I had the chicken breast laid out on top of the forcemeat, I was pretty confident that I’d be able to finish up this challenge without a hitch.  I was wrong.

IMG_9945

Rolling the galantine into an even cylinder proved to be extremely difficult for me.  After a few tries, the best I could muster was a galantine shaped more like one of the Michelin Man’s appendages or Lumpy Space Princess.  I was afraid if I didn’t tie the support strings tight enough the forcemeat would spill out.

IMG_9949

In order to make the galantine a true Chinese soy sauce chicken galantine, I poached it in the mother sauce I created about a year ago when I made my first soy sauce chicken.  The mother sauce is a combination of soy sauce, chicken stock, rock sugar, ginger, scallion, garlic, cinnamon, and star anise.  Each time it’s used to poach something, fresh aromatics are added and the meat being poached deepens the flavor of the liquid.  The soy sauce gave the skin that distinct brown hue that comes with every soy sauce chicken.

IMG_0028

Yes, the galantine looked like a piece of poop as a whole, but when sliced it was hard to tell.  Although the slices did come out a bit oblong, the flavors and textures were spot on.  The wood ear fungus provided crunchiness and the shiitake provided a little more meatiness to the soft forcemeat.  As is traditional in Chinese cuisine, I garnished the cold chicken galantine with ginger-scallion oil which was a nice refreshing contrast to the dark flavors imparted by the mother sauce.  Overall, the dish was new yet familiar at the same time.  Overlooking the failure to roll the galantine perfectly, I felt pretty good about how this month’s challenge ended up.

IMG_0046


Ginger-Scallion Oil

Via my recipe previously posted here

Chinese Mother Sauce (makes about 2 kg)

Mise En Place

  1. 1 kg chicken stock or water
  2. 0.5 kg soy sauce
  3. 0.5 dark soy sauce
  4. 100 g vermouth
  5. 100 g ginger, sliced and smashed
  6. 100 g scallion, roughly chopped
  7. 100 g garlic, smashed
  8. 100 g rock sugar
  9. 10 g black peppercorn
  10. 2 star anise
  11. 1 cinnamon stick

Method

  1. Simmer for 2-3 hours, tasting every now and then and adjusting accordingly
  2. Strain

Galantine Forcemeat Aromatics

Mise En Place

  1. 18 g ginger, minced
  2. 18 g scallion, minced
  3. 18 g garlic, minced

Galantine Forcemeat Garnish

Mise En Place

  1. 20 g dried shiitake mushrooms, soaked in warm water for 30 minutes
  2. 20 g dried wood ear fungus, soaked in warm water for 30 minutes

Thursday, September 15, 2011

Pate Chaud: Vietnamese Pork Pie

IMG_7834

As challenging and fun making pate en croute sounds, I sadly didn’t have enough time this month to take a stab at it.  Thankfully, English pork pie was offered as an alternative for the September CharcutePalooza challenge.  I didn’t know what an English pork pie consisted of until I read the recipe in Charcuterie.  Once I read the recipe, though, I was completely familiar with it and realized that I’d been making pork pies for the past few years and eating them since childhood in the form of pate chaud.

IMG_7735

Pate chaud is essentially the Vietnamese version of a pork pie.  Instead of Western seasonings, the pork is typically seasoned with fish sauce.  Depending on the cook, miscellaneous things like wood ear mushrooms may be added for a crunchy texture.  However, my grandma’s vegetarian version that I grew up on consisted of Morningstar Griller soy meat, mushrooms, peas, carrots, and Maggi (sort of like soy sauce) baked inside a handheld puff pastry shell.  The soy meat never bothered me because to this day I still prefer her version over any meat-based pate chaud I’ve ever tried.

IMG_7762

My goal for this month’s challenge was to use the English pork pie recipe and technique in Charcuterie as a foundation and impart my grandma’s influence on it in order to make a respectable pork pate chaud.  Typically my grandma uses frozen peas, but I saw some nice snap peas at the market and had to use them.  Also, my grandma and I usually use premade frozen puff pastry dough, but making my own pastry dough from scratch this time was a good experience.

IMG_7795

With the exception of a slightly soggy bottom (probably due to underestimating the amount of water released from the mushrooms) the pate chaud came out pretty good.  The pastry was understandably less flaky than the puff pastry that I’m used to, but it was flaky enough to hold its own.  One regret was not forming the pate chaud into its traditional handheld portions.  This would’ve made freezing and reheating portions much easier.

In all honesty, though, I still prefer my grandma’s vegetarian pate chaud.  There’s just something about the combination of soy meat, mushrooms, peas, carrots, and Maggi that I just love.

IMG_7825


Pate Chaud Meat Filling

Mise En Place

  1. 675 g pork, freshly ground
  2. 100 g peas, diced
  3. 100 g carrots, diced
  4. 100 g shiitake mushrooms, roughly chopped
  5. 5 g black pepper, freshly ground
  6. 80 g mushroom-pork stock, reduced slightly more than normal and chilled
  7. 40 g Maggi, European version with red top is preferable

Monday, August 15, 2011

HEADCHEESE – parsley root, doenjang mustard, smoldering cinnamon

Having been exposed to headcheese at a young age through banh mi, I fortunately don’t have an aversion to it.  I also have no qualms about handling a pig’s head as I’ve cooked with it in the past.  Although I’ve used pig’s head for tamales, congee, and barbeque in the past, I’ve never made headcheese.  This month’s CharcutePalooza challenge provided a great excuse to finally make some.

IMG_7633

For the headcheese challenge, I wanted to focus on texture because headcheese typically lacks in that department.  Placing some headcheese on top of a cracker didn’t sound very fun, so I thought about battering and deep frying pieces of headcheese.  However, I wanted to preserve the integrity of the gelatin in the headcheese and prevent it from melting in the fryer.  After all, where’s the fun in eating headcheese if it doesn’t have any gelatin?

IMG_7566

The use of agar-agar came to mind as a way to keep the gelatin from melting under high heat.  My mom used to make jasmine-coconut agar jelly when I was young, so working with agar wasn’t too foreign to me.  The application of agar in a hot preparation, though, was a first.  I already knew agar-based gelatins held their gel state at room temperature, and a little research revealed that agar-based gelatins melt at 85 Celsius.  I decided to use agar threads as they’re readily available at most Asian grocers and 3 times cheaper than agar powder found online.

IMG_7571

Since I received some negative responses about showing a pig’s head in previous head-related posts, I’ll spare readers the sight of the suckling pig’s head I bought from Marketplace Oakton.  I feel pretty spoiled having suckling pig’s head so readily available and for only $0.99/lb.  After poaching the head and separating the liquid, I added enough agar to bring the liquid to a 1% agar solution.  I’m not sure how apparent it is in the picture above, but I think I added too much liquid to the mold.

During my research into how much agar to use per unit of liquid, I stumbled upon Grant Achatz’s pheasant with burning oak leaves and sweet potato with smoldering cinnamon stick recipes.  I’ve had the fortunate opportunity to eat at Alinea a few times, so I was familiar with the “tempura on a skewer that serves as an aroma source” style of preparation.  It didn’t take long for me to realize that preparing the headcheese in a similar fashion would be interesting and fun.

IMG_7555

When thinking about what to pair the headcheese with, I looked to classic combinations like pickles and mustard.  Initially, I wasn’t sure what I’d use for the pickle, but upon seeing fresh parsley root at Marketplace Oakton I knew I had to use it.  It was only natural to use the leaves in the poaching liquid and make a quick pickle out of the roots.

IMG_7615

The previous week I worked with doenjang (a fermented soybean paste akin to miso) for the first time and made some doenjang jigae.  Being on somewhat of a doenjang binge and with mustard on my mind, I was reminded of my cousin’s miso salad dressing I had as a kid.  The miso salad dressing tasted like honey mustard, so I figured an agar-based doenjang mustard gel would work nicely.

IMG_7617IMG_7622

A common element between the mustard, pickled parsley root, and headcheese was allspice.  Since allspice and cinnamon go hand in hand, the choice of a cinnamon stick skewer made sense.  The tempura batter specified by Achatz was super light and when fried provided a nice crispy texture.  Using a blowtorch, I set the top of the cinnamon stick ablaze to release its aroma.

IMG_7630

To plate the bite, I used an old wire whisk (a great idea from Martin over at Alineaphile) to achieve some semblance of the original served at Alinea that comes nestled in the “squid” by Crucial Detail.  The squid is “designed to hold a delicate course in an upright position.  Six thin wires distribute weight evenly and allow air flow around the dish.”

IMG_7664

Overall, the tempura headcheese was a success and a lot of fun to research and implement.  Deep frying headcheese and having the gelatin not melt tickled me pretty good.  I also achieved my goal of highlighting texture for this challenge.  The fried tempura batter provided crispiness and the pickled parsley root provided crunchiness.  Everything worked from a flavor standpoint as well.  The combination of headcheese, pickle, and mustard was immediately familiar, and the addition of doenjang added a sweet note to the bite.

I don’t know if I’ll be making these again any time soon due to the amount of time required, but I’m confident enough to try Achatz’s pheasant and sweet potato recipes now that I’m familiar with the general strategies.  I’m also walking away with a great tempura batter ratio.  Out of all the CharcutePalooza challenges thus far, this one has been my favorite as I’ve learned the most from it.


Doenjang Mustard Gel (adapted from here)

Mise En Place

  1. 30 g yellow mustard seeds
  2. 30 g brown mustard seeds
  3. 60 g doenjang
  4. 1 g white peppercorns
  5. Pinch allspice
  6. 70 g white wine
  7. 70 g vinegar
  8. 45 g shallot, minced
  9. 3 g agar

Method

  1. Combine all ingredients and refrigerate overnight
  2. Transfer all ingredients to a saucepan or pot over high heat and bring to boil
  3. Quickly transfer all ingredients to a blender and blend for ~2 minutes
  4. Quickly transfer mixture into a small mold (must set to at least 3 mm thickness) and refrigerate until completely set, ~2 hours

HEADCHEESE – pickled parsley root, doenjang mustard, smoldering cinnamon (adapted from here)

Mise En Place

  1. Headcheese, cut into a 2 cm cubes
  2. Pickled parsley root, cut into 2 cm X 2 cm X 3 mm rectangular prisms
  3. Doenjang mustard gel, cut into 2 cm X 2 cm X 3 mm rectangular prisms
  4. Cinnamon stick, pared down thin enough on one end to skewer the ingredients
  5. Flour for dredging
  6. Tempura batter

Method

  1. Skewer the pickled parsley root onto the cinnamon stick, followed by the doenjang mustard gel, and lastly the headcheese
  2. Dredge the ingredients in flour and shake off any excess
  3. Coat the ingredients in tempura batter and let any excess drip off
  4. Holding onto one end of the cinnamon, dip ingredients in 190 Celsius oil until golden, ~2 minutes
  5. Drain on paper towels and season with salt
  6. Take a flame to one end of the cinnamon until smoldering